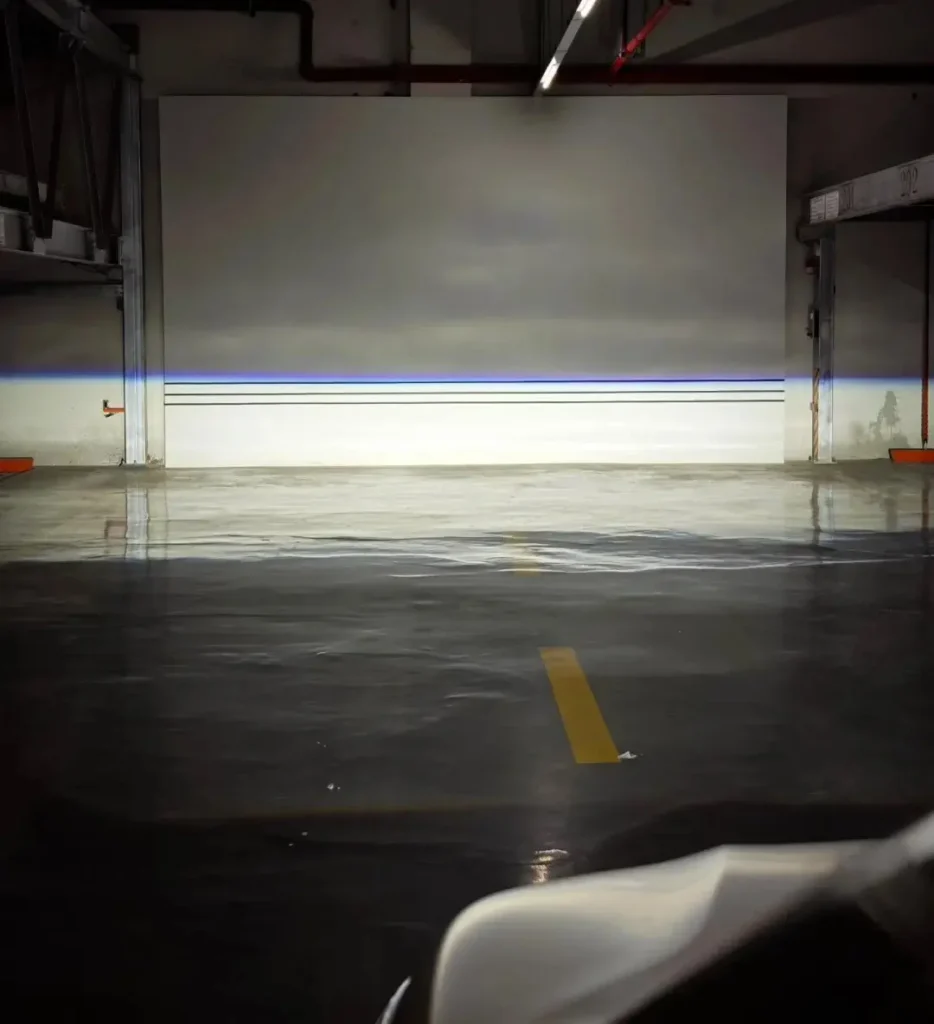
Les phares à projecteur sont un peu magiques la première fois que l'on voit une ligne de démarcation nette sur un mur : ils sont précis, contrôlés et beaucoup moins “pulvérisateurs” que les anciens phares à projecteur. réflecteur Les boîtiers sont très différents les uns des autres. Mais l'idée sous-jacente est simple : une bonne optique, une source lumineuse bien contrôlée et (surtout) une visée correcte.
Dans ce guide, j'aborderai les points suivants Fonctionnement des projecteurs dans un langage simple, puis vous guidera à travers Comment aligner les phares de projecteurs à l'aide d'une méthode murale simple, proche de ce que font les magasins, sans en faire un cours de physique.
Qu'est-ce qui différencie un projecteur d'un autre ?
La plupart des phares font le même travail - pousser la lumière vers la route - mais ils ne façonnent pas cette lumière de la même manière.
- Phares à réflecteurs utilisent un réflecteur en forme de bol pour faire rebondir la lumière vers l'avant. Ils sont simples et bon marché, mais le contrôle du faisceau dépend fortement de la géométrie du réflecteur et de la position de l'ampoule.
- Projecteurs utiliser des optiques (un réflecteur + une lentille, et généralement un écran de coupure) pour focalisation et forme le faisceau avec plus de précision.
C'est grâce à cette précision qu'un bon projecteur peut être lumineux sans parce que la lumière est placée là où elle est utile, et non dispersée dans toutes les directions.
Comment fonctionnent les projecteurs ? (Pas à pas)
Un projecteur est en fait un petit système optique situé à l'intérieur du boîtier du projecteur. Les pièces principales fonctionnent ensemble de la manière suivante :
1) La source lumineuse est d'abord désordonnée
Si la source est HID (xénon) ou LED, La lumière ne quitte pas naturellement l'ampoule/la puce sous la forme d'un faisceau net vers l'avant. Elle se propage dans de nombreuses directions.
Cette sortie dispersée est la matière première. Le travail du projecteur consiste à la rassembler et à la mettre en forme.

2) Le réflecteur “rassembleur” (votre petit bol concentrateur)
À l'intérieur du projecteur se trouve un réflecteur compact, qui a souvent la forme d'un petit bol. Il s'agit en quelque sorte du collecteur de lumière.
- Il capte la lumière qui, autrement, irait de côté et vers l'arrière.
- Il redirige cette lumière vers l'avant de manière plus organisée.
- Bien réalisée, elle transforme une lueur chaotique en quelque chose de plus proche d'un faisceau contrôlé.
Votre remarque sur la création d'une lumière “parallèle” est la bonne intuition : le réflecteur réduit le caractère aléatoire et envoie la lumière vers l'avant dans une direction avec laquelle l'objectif peut réellement travailler.
3) L'écran de coupure crée une ligne nette (en particulier pour les feux de croisement).
C'est la partie dont beaucoup de gens ne se rendent pas compte qu'elle joue un rôle important dans le contrôle de l'éblouissement.
Pour feux de croisement, Les projecteurs sont généralement équipés d'un bouclier de coupure placé dans le chemin optique. Il bloque la partie supérieure du faisceau, ce qui permet d'obtenir :
- une forte horizontalité ligne de démarcation
- moins de lumière au-dessus de la ligne de coupure (où elle brillerait dans les yeux des conducteurs venant en sens inverse)
Cette “marche” nette que l'on observe sur de nombreuses poutres (plus haute à droite sur les marchés LHD, plus haute à gauche sur les marchés RHD) est également créée par la géométrie du bouclier.
Si vos phares semblent “brillants mais flous”, ou si la coupure est floue, c'est souvent lié à.. :
- l'état de l'objectif (voile, saleté, vieillissement)
- l'alignement interne/la qualité du projecteur
- ampoules mal adaptées/échange de LED dans des boîtiers non prévus à cet effet
4) Les lentille convexe concentre et répartit le faisceau en un modèle utilisable
Après que le réflecteur a recueilli la lumière et que le bouclier l'a mise en forme, le lentille convexe termine le travail.
Lorsque la lumière traverse la lentille, la réfraction courbe les rayons et contribue à leur formation :
- un hotspot ciblé (intensité utile là où vous en avez besoin)
- un étalement contrôlé (de sorte que les accotements et les bords de la voie soient visibles)
- un bord de coupure défini (pour le confort et la sécurité des feux de croisement)
C'est pourquoi les projecteurs donnent souvent l'impression d'avoir une “portée plus longue” et des “détails routiers plus nets” - pas nécessairement parce qu'ils produisent plus de lumens, mais parce qu'ils ont une plus grande capacité d'absorption. gaspiller moins de lumière.
5) La texture de la surface de la lentille permet de lisser le faisceau
Certaines lentilles de projecteur sont parfaitement claires ; d'autres présentent une texture subtile, des stries ou des micro-structures. Ces détails de surface peuvent :
- transitions difficiles légèrement diffuses
- réduire les artefacts
- améliorer l'uniformité perçue sur l'ensemble du faisceau
Il ne s'agit pas de rendre la lumière “aléatoire”. Il s'agit de lisser le faisceau afin d'éviter les zones lumineuses gênantes et les zones mortes.
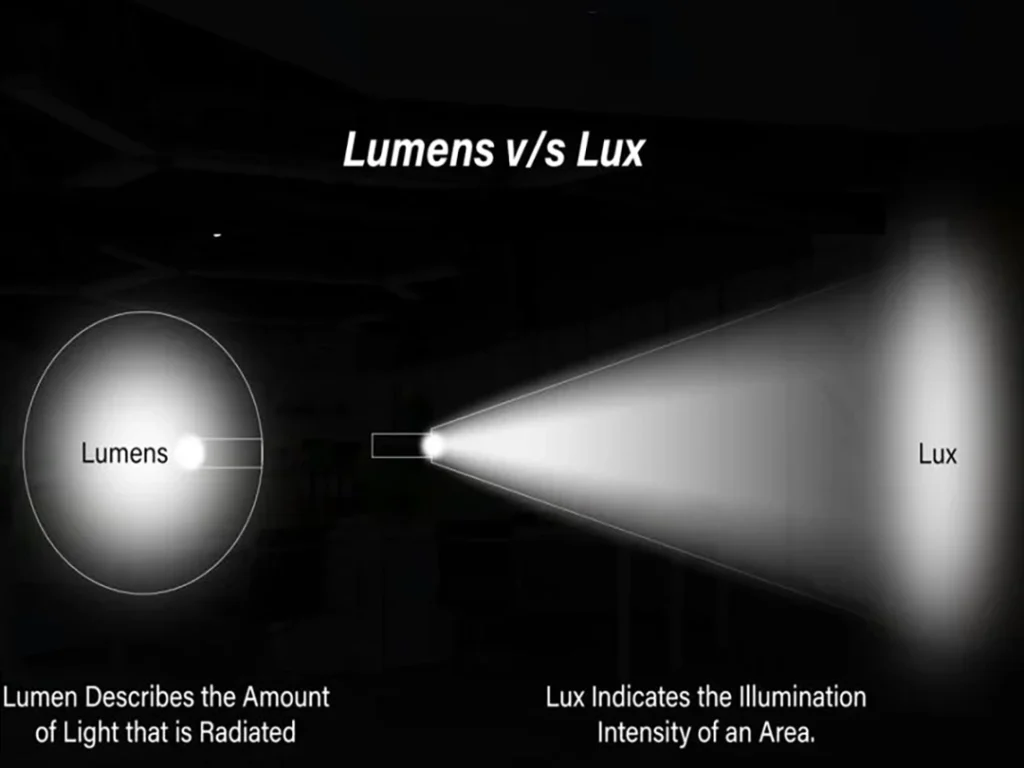
Pourquoi le nombre de lumens ne dit pas tout
Vous avez déjà fait allusion à cette idée dans votre phrase précédente sur “n'importe quel nombre de lumens”, et cela vaut la peine de le répéter dans le contexte des projecteurs.
Deux phares peuvent revendiquer des lumens similaires, mais sur la route, ils peuvent donner l'impression d'être totalement différents :
- Modèle de faisceau (l'endroit où la lumière se pose) est plus important que le rendement brut.
- Contrôle de la coupure affecte le confort et l'éblouissement.
- Efficacité optique détermine la part de cette lumière qui devient utile à l'éclairage de la route.
Avec un bon projecteur, “moins” semble être “plus”, car il place la lumière là où vos yeux l'utilisent réellement.
Signes concrets du bon fonctionnement (ou non) de vos projecteurs
Bons signes
- Une ligne de coupure nette sur un mur
- Avant-plan clair et uniforme sans grande zone d'ombre
- Un point chaud qui s'étend vers l'avant sans éblouissement excessif au-dessus de la coupure
- Symétrie : les faisceaux gauche et droit se ressemblent
Mauvais signes
- “Coupure ”floue" même après nettoyage de l'objectif
- Projection de lumière vers le haut (plaintes relatives à l'éblouissement, clignotement des voitures venant en sens inverse)
- Un côté plus haut que l'autre
- Le faisceau semble pointer davantage vers les arbres ou les panneaux de signalisation que vers la route.
Si l'une de ces situations vous semble familière, la première chose à vérifier est de viser.
Comment aligner les phares d'un projecteur (méthode murale que vous pouvez faire à la maison)
Vous n'avez pas besoin d'une machine sophistiquée pour vous en approcher. Il faut cependant de la patience, une surface plane et un mur propre.
Avant de commencer : bien préparer la voiture
Choisissez votre lieu de résidence
- Terrain plat, de niveau (aire de garage, terrain vide)
- Un mur vertical de couleur claire (le blanc est idéal)
Distance au mur
- Gamme de produits de bricolage courants : 5-7,6 mètres (à propos de 16-25 ft)
- Si vous voulez la distance “courante dans l'industrie” : 7,6 m / 25 ft est la référence classique
L'état du véhicule est plus important qu'on ne le pense
- Pneus à la bonne pression
- Charge normale (au moins environ une demi-citerne est une bonne habitude)
- Rien de lourd dans le coffre que vous ne transportez pas habituellement
- Faites rebondir la voiture une ou deux fois pour la stabiliser. suspension
- S'assurer que les lentilles des phares sont propres
Outils
- Ruban à mesurer
- Ruban adhésif (plus facile à ajuster qu'une craie)
- Tournevis ou clé hexagonale (en fonction des dispositifs de réglage des phares)
- Manuel du propriétaire (pour connaître l'emplacement des ajusteurs)
Étape 1 : Déterminer la hauteur du centre du phare
Mesurer depuis le sol jusqu'à la centre de l'objectif du projecteur (ou centre optique de faisceau faible) de chaque côté.
Marquez cette hauteur sur le mur à l'aide d'un ruban adhésif horizontal.
Vous obtiendrez ainsi
- a ligne de référence horizontale à la hauteur du centre du phare
Étape 2 : Marquer l'axe du véhicule et l'axe des phares
Marquez maintenant :
- Le axe du véhicule (à partir du milieu de la grille/emblem)
- Le l'axe des phares gauche et droit (en ligne droite à partir du centre de chaque projecteur)
Utilisez des bandes verticales de ruban adhésif pour chacun d'entre eux.
Vous obtenez ainsi une grille simple :
- une ligne horizontale (hauteur)
- trois lignes verticales (feu gauche, centre du véhicule, feu droit)
Étape 3 : Allumer les feux de croisement et lire le seuil de coupure
Allumer feux de croisement et observez le motif de la coupure sur le mur.
Ce que vous recherchez :
- Le ligne de démarcation devrait être légèrement inférieur la ligne de hauteur centrale du phare à la distance choisie.
- Les faisceaux gauche/droit doivent être même (aucun faisceau n'est manifestement plus élevé).
- Le faisceau ne doit pas être oblique (à moins que la coupure de votre voiture ne comporte une marche conçue à cet effet).
Jusqu'à quel point peut-on parler de “légère baisse” ?
Un objectif de bricolage pratique que de nombreuses personnes utilisent à 25 ft (7,6 m) Il s'agit de 2-5 cm (environ 1-2 pouces) en dessous de la hauteur du centre du phare.
Vos notes mentionnent 2-3 cm-C'est un “point de départ” raisonnable si la voiture est de niveau et si vous utilisez une distance standard.
La clé : ne pas viser la ligne d'altitude exacte, Il est important d'avoir une bonne vision de la lumière, car les bosses et le tangage du véhicule envoient cette lumière dans les yeux des autres automobilistes.
Étape 4 : Ajuster d'abord la visée verticale (haut/bas)
Trouver le réglage vertical (souvent marqués par ↑ ↓ sur le boîtier).
- Tournez lentement - de petits changements peuvent déplacer la limite sur le mur.
- Réglez jusqu'à ce que les deux seuils soient à la même hauteur et que votre objectif soit inférieur à la ligne de référence.
Conseil : si votre voiture est équipée d'une molette de réglage des phares dans l'habitacle, réglez-la sur la position normale/par défaut avant de viser.
Étape 5 : Ajuster la visée horizontale (gauche/droite)
Trouver le réglage horizontal (souvent marqués par ← →).
Objectif :
- Chaque faisceau doit s'aligner sur son propre repère d'axe de phare.
- Le motif doit être symétrique et ne pas pointer d'un côté.
N'exagérez pas les ajustements horizontaux. Si vous avez besoin d'une correction importante, vérifiez les points suivants
- un phare mal fixé
- dommages dus à un accident
- mauvais positionnement de l'ampoule/LED
- boîtier inadapté au véhicule
Étape 6 : Contrôle routier et mise au point (la partie que les gens sautent)
La visée murale permet de s'approcher du but. Le contrôle sur route confirme le confort et l'utilité.
Sur une route sombre :
- Vous devez voir clairement les bords des voies sans avoir l'impression de surcharger le faisceau.
- Les panneaux réfléchissent (c'est toujours le cas), mais vous ne devriez pas voir de lumière excessive au-dessus de la limite.
- Si des véhicules circulant en sens inverse vous éclairent, abaissez légèrement l'objectif et vérifiez à nouveau.
Erreurs courantes lors de l'alignement des projecteurs
1) Mesure à partir d'un point erroné
Mesure de la centre de la lentille du projecteur, et non par le haut du boîtier.
2) Viser sur un sol irrégulier
Une petite pente peut ruiner toute l'installation. Si votre coupe semble parfaite sur le mur mais terrible sur la route, vérifiez à nouveau que le sol est plat.
3) Réglage sans charge normale du véhicule
Si vous visez avec un réservoir vide et sans chargement, puis que vous chargez le coffre, l'avant se soulève et vos feux se lèvent - bonjour l'éblouissement.
4) S'attendre à ce que tout soit parfait alors que le matériel est fatigué
Des lentilles troubles, des réflecteurs vieillis ou des projecteurs bon marché peuvent créer une coupure floue. L'alignement ne peut pas réparer une optique cassée.
Quand faut-il laisser un magasin s'en occuper ?
La plupart du temps, il est possible de bricoler, mais il faut envisager l'utilisation d'un équipement professionnel si.. :
- vous êtes passé à HID/LED et n'ont pas confiance dans la forme du faisceau
- la voiture était en réparation avant
- un faisceau ne correspond pas à l'autre, quoi que vous fassiez
- vous continuez à vous faire flasher par les conducteurs venant en sens inverse
Un appareil de visée approprié et un technicien attentif peuvent vous épargner bien des tâtonnements.
Récapitulation rapide (les deux choses les plus importantes)
- Comment fonctionnent les projecteurs ?
Un réflecteur rassemble la lumière dispersée, un bouclier la façonne (en particulier la coupure des feux de croisement) et une lentille convexe la concentre et la distribue en un faisceau contrôlé et plus lumineux. là où ça compte. - Comment aligner les projecteurs ?
Utilisez une surface plane et un mur, marquez la hauteur et les lignes médianes, orientez la coupure légèrement en dessous de la hauteur de référence entre 5 et 7,6 m, puis ajustez-la sur la route.
Si vous me dites quel est votre marché cible (US LHD vs UK/AU RHD) et la distance prévue entre les murs (5 m ou 7,6 m), je peux adapter les cibles de visée et la formulation de manière à ce que le document semble avoir été écrit pour ce public précis, et non pour un guide générique.