Dulu saya berpikir lampu kabut sederhana: tambahkan sepasang, dapatkan bagian depan yang lebih terang, selesai. Setelah mengerjakan beberapa mobil yang berbeda, polanya menjadi jelas-lampu kabut bukan tentang “kecerahan”. Mereka tentang bagaimana mobil disiapkan (kabel, logika sakelar, sekering/relai penyediaan, titik pemasangan) dan apakah Anda memasang dan mengarahkannya seperti yang seharusnya: lebar, rendah, terkendali.
Tulisan ini sengaja tidak mengulang tulisan saya tentang Alto/Ertiga/Santro Xing. Di sini saya berfokus pada tiga pemasangan yang berbeda-lampu kabut baleno, mengalahkan lampu kabut, lampu kabut brezza-Ditambah dengan bagian bahasa Inggris sederhana tentang apa yang sebenarnya dimaksud orang ketika mereka mencari diagram pemasangan lampu kabut. Saya juga akan menyentuh bagian “lampu kabut untuk Aktif” (masalah trim rendah/tengah yang umum terjadi: bumper kosong, tidak ada sakelar, kabel tidak diketahui).
1) Lampu kabut Baleno: mobil “berpenampilan OEM” yang masih menghukum pemasangan yang terburu-buru
Baleno adalah jenis mobil di mana orang ingin retrofit terlihat seperti mobil pabrik. Bemper biasanya bekerja sama, bezelnya pas, dan hasil akhirnya bisa bersih. Kesalahan terjadi di belakang layar:
Apa yang cenderung salah pada retrofit Baleno
- Pemasangan yang longgar = balok goyah
Cahayanya berfungsi, tetapi polanya menari-nari di jalan yang kasar. Itu tidak “normal”; biasanya itu adalah masalah pemasangan braket. - Kesesuaian konektor yang terasa “hampir terpasang”
Jika konektor tidak terkunci sepenuhnya, Anda akan mendapatkan kabut yang terputus-putus dan mati saat jalan basah. - Penukaran bohlam LED di dalam rumah reflektor
Di sinilah pemilik Baleno sering kecewa. Anda mendapatkan “keputihan” tetapi kehilangan olesan yang dapat digunakan, dan terkadang Anda menciptakan silau dalam kabut.
Apa yang akan saya lakukan secara berbeda (edisi Baleno)
- Perlakukan pemasangan seperti pekerjaan suspensi: ketat, selaras, tidak ada permainan.
- Jika menggunakan LED, prioritaskan bentuk balok dan disiplin pemotongan, bukan suhu warna.
- Biarkan membidik di siang hari dan lakukan pengecekan singkat di jalan basah nanti. Hidung Baleno yang rendah membuat bidikan yang “terlalu tinggi” terlihat bagus di dinding, tetapi buruk saat hujan.
2) Kalahkan lampu kabut: mobil kecil, suku cadang kecil, tidak perlu kesabaran
Pada Beat, pekerjaan lampu kabut jarang sekali “sulit”, tetapi mudah sekali membuatnya menjengkelkan. Semuanya lebih kecil: ruang akses, pengencang, dan margin Anda untuk menarik benda yang salah terlalu keras.
Mengalahkan realitas pemasangan lampu kabut
- Akses bisa jadi ketat (pekerjaan pelapis roda, tangan kecil menang).
- Klip lama tidak bisa dinegosiasikan
Jika klip terasa akan patah, kemungkinan besar akan patah. Belilah suku cadang sebelum Anda mulai. - Tanah lebih penting dari yang Anda harapkan
Ground yang agak lemah bisa terlihat seperti bola lampu yang sekarat: redup, berkedip-kedip, atau satu sisi tertinggal.
Apa yang membuat upgrade lampu kabut Beat terasa sepadan
Mengalahkan tidak membutuhkan jarak. Ia membutuhkan kepercayaan diri jarak dekat:
- tepi trotoar yang lebih jernih saat hujan
- lebih sedikit “lubang hitam” langsung di depan pada aspal basah
- kehadiran yang lebih baik untuk lalu lintas yang datang selama penyemprotan yang deras
Jika Anda membidik pada jarak yang rendah dan rata, Beat tidak terlalu melelahkan dalam cuaca buruk-tanpa harus mengubahnya menjadi “proyektor”.”
3) Lampu kabut Brezza: posisi yang lebih tinggi, hasil yang berbeda (dan kesalahan yang berbeda)
Brezza adalah tempat orang mengejar hasil. Mobil duduk lebih tinggi, pemandangan jalan berbeda, dan Anda merasa seakan-akan Anda bisa mendorong bidikan ke atas. Itulah cara lampu kabut menjadi pembuat silau.
Retrofit lampu kabut Brezza: apa yang harus diperhatikan
- Bidik merayap
“Sedikit lebih tinggi” menjadi “mengapa semuanya berwarna putih saat hujan?” - Unit LED yang terlalu besar/berkekuatan besar dalam rumah kecil
Panas dan penyegelan menjadi masalah yang nyata. Kit cerah yang berkabut secara internal adalah kekecewaan yang lambat dan mahal. - Getaran + kelenturan bumper
SUV mengalami lebih banyak benturan dan lebih banyak gerakan bemper. Jika lampu tidak terpasang dengan kokoh, sinar tidak akan berada di tempat yang Anda arahkan.
Apa yang paling berhasil bagi saya di Brezza
- Pengaturan yang menghasilkan karpet cahaya yang rendah dan lebar bukannya titik panas.
- Bidikan konservatif dan verifikasi jalan nyata dalam hujan/semprotan.
4) Lampu kabut untuk Aktif: apa arti “Aktif” biasanya di dunia nyata
Ketika seseorang mencari lampu kabut untuk Aktif, biasanya berurusan dengan trim yang memiliki:
- bumper kosong / penutup dummy
- tidak ada sakelar kabut pada tangkai
- status pra-kabel yang tidak diketahui (beberapa mobil memilikinya, beberapa tidak, terkadang hanya satu sisi harness yang ada)
Pohon keputusan “Pemangkasan aktif” (cepat dan praktis)
- Apakah bumper Anda sudah memiliki titik pemasangan lampu kabut di belakang bagian yang kosong?
Jika ya, bagus sekali-pekerjaan Anda sebagian besar adalah komponen dan pemasangan kabel. - Apakah ada konektor pabrik yang ditempelkan di belakang bumper?
Jika ya, Anda sudah mendekati solusi gaya OEM. - Apakah ada ketentuan dalam kotak sekering untuk relai kabut/sekering posisi?
Jika ya, Anda dapat sering kawat itu dengan bersih. - Tidak ada pra-kabel sama sekali?
Kemudian lakukan dengan benar: daya yang menyatu, relai, arde yang baik, dan sakelar yang Anda percaya-tidak ada kabel yang terbelit, tidak ada jalan pintas “ketuk di mana saja”.
“Aktif” bukanlah sebuah masalah. Menebak adalah masalah.
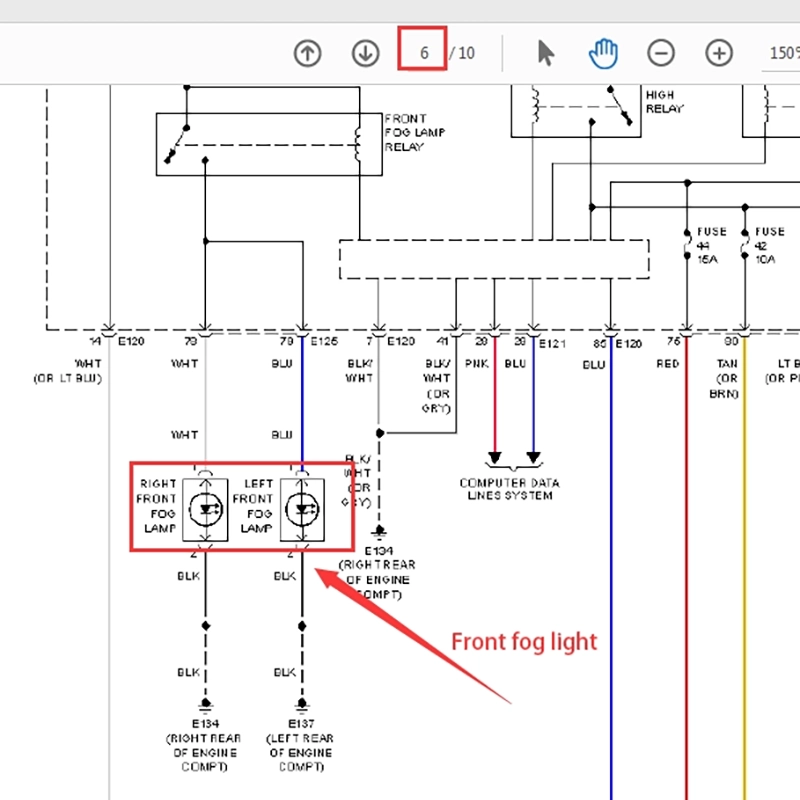
5) Diagram pemasangan lampu kabut (apa yang sesungguhnya Anda perlukan, bukan gambar yang membingungkan)
Sebagian besar diagram online gagal karena terlalu umum atau terlalu berantakan. Yang dapat digunakan diagram pemasangan lampu kabut harus menjawab hanya satu pertanyaan:
Bagaimana cara menyalurkan daya dari baterai ke kedua lampu dengan aman, dan apa sebenarnya yang memicunya?
Berikut ini adalah tata letak universal yang bersih yang dapat Anda sesuaikan dengan trim Baleno/Beat/Brezza/Active:
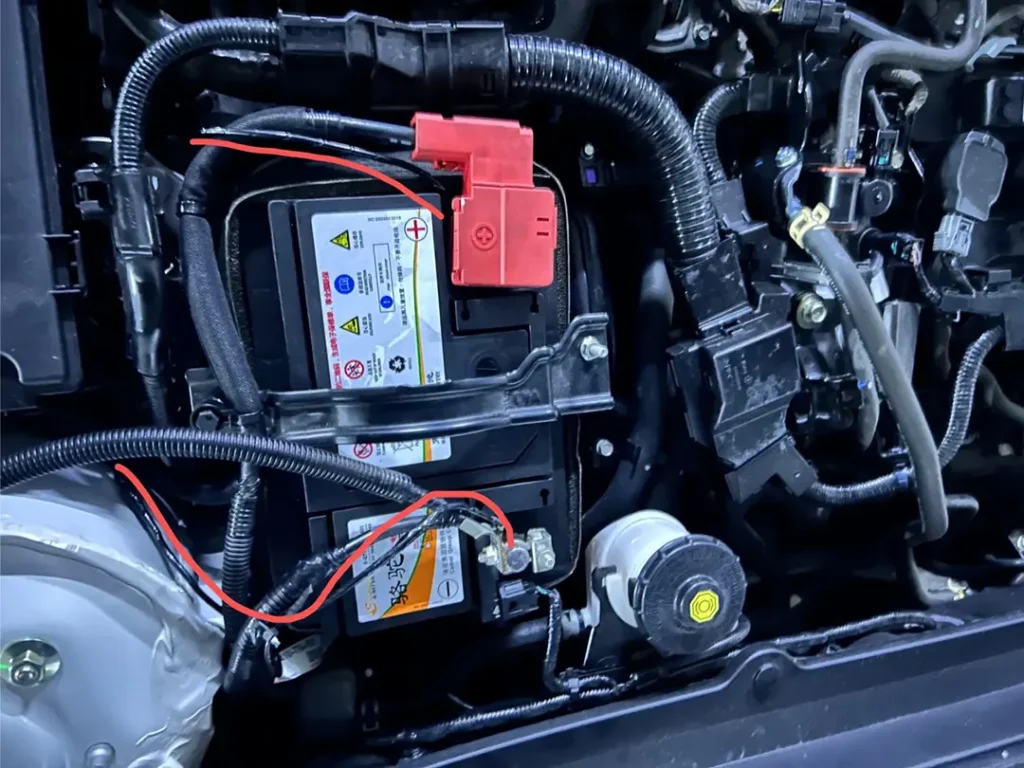
DIAGRAM INSTALASI LAMPU KABUT (kabel relai dasar)

Baterai (+)
  |
 [Sekering Sebaris] (tempatkan di dekat baterai)
  |
 (30) Relai (87) ---------------------> + Lampu Kabut Kiri
              \-----------------------> + Lampu Kabut Kanan

Lampu Kabut Kiri (-) --------------------> arde sasis (titik logam bersih)
Lampu Kabut Kanan (-) --------------------> arde sasis (titik logam bersih)

Pemicu relai (sisi kontrol):
Pengapian/ACC atau Lampu Parkir (+) -----> Sakelar Kabut -----> (86) Koil Relai
(85) Koil Relai -----------------------> Landasan Sasis
Catatan yang mencegah kegagalan yang biasa terjadi
- Sekering segaris di dekat bateraimelindungi seluruh proses.
- Relay melakukan pekerjaan beratsakelar hanya memicu, tidak membawa arus lampu.
- Dua alasan, dilakukan dengan benar: landasan yang buruk adalah alasan #1 mengapa instalasi yang “berfungsi” menjadi terkelupas.
- Pilihan sumber pemicu penting:
- Jika Anda memicu dari lampu parkir, kabut tidak dapat dibiarkan menyala secara tidak sengaja di siang hari.
- Jika Anda memicu dari kunci kontak/ACC, mereka dapat digunakan kapan saja saat mobil menyala (tergantung pada peraturan dan preferensi setempat).
Jika mobil Anda memiliki pra-kabel OEM, Anda mungkin tidak perlu membuat ini dari awal - tetapi diagram ini masih berguna karena membantu Anda memahami apa yang dilakukan oleh harness OEM.
6) Daftar periksa singkat “sebelum Anda memesan suku cadang” (Baleno / Beat / Brezza / Active)
- Konfirmasi jenis lampu + gaya pemasangan (beberapa kit terlihat serupa tetapi pemasangannya berbeda)
- Konfirmasi jenis konektor (jangan berasumsi bahwa itu cocok)
- Putuskan lebih awal: halogen vs LED vs proyektor (bentuk balok terlebih dahulu)
- Rencanakan waktu membidik (jangan “membidik berdasarkan getaran”)
- Beli klip cadangan jika mobil Anda lebih tua atau klip bumper/liner terlihat lelah
Pikiran penutup
Jika saya harus mengompresnya:
- Lampu kabut Baleno adalah tentang fitment gaya OEM yang bersih-dan tidak merusak sinar dengan penukaran LED yang malas.
- Mengalahkan lampu kabut adalah tentang kesabaran dan keandalan: klip, landasan, akses yang ketat.
- Lampu kabut Brezza adalah tentang disiplin: bidikan lebar/rendah dan menahan godaan untuk membidik tinggi.
- Lampu kabut untuk Aktif sebagian besar merupakan masalah “kabel yang tidak diketahui” - selesaikan dengan rencana relai/sekering yang tepat.
- Bagus diagram pemasangan lampu kabut memang sengaja dibuat sederhana: daya yang aman, landasan yang kokoh, logika pemicu yang jelas.
Jika Anda memberi tahu saya, “Aktif” mana yang Anda maksudkan (model + tahun/trim), saya bisa menyesuaikan diagram agar sesuai dengan tata letak pabrik Anda yang mungkin (pra-kabel vs kabel penuh) dan menyarankan di mana sakelar/pemicu seharusnya berada.