Quick take (for skimmers)
On a 4Runner, grille lights shouldn’t be a fragile “pretty mod.” If you wheel, drive in winter, or wash the truck hard, the best setup is the one you can inspect and service without tearing the whole front end apart.
Why 4Runner lampu grille fail in the real world (and it’s not always the lights)
Most 4Runner builds live a tougher life than a commuter SUV. Even if you’re not rock-crawling every weekend, the truck still sees:
- pressure washes that force water where it doesn’t belong
- mud and grit that turn wiring into sandpaper
- vibration that slowly loosens anything mounted “good enough”
- winter salt that punishes cheap hardware
So the goal isn’t “bright.” The goal is stable, sealed, and easy to check.
This is a placement and fitment guide, not a wiring walkthrough.
Start with the three placement zones (the easiest way to avoid regret)
Instead of asking “Where can I stick them?” decide which zone fits your priorities.
Zone A: Service-friendly openings (best all-around choice)
These are the spots where you can:
- mount with solid anchor points
- route wiring cleanly
- reach fasteners later
- avoid shining directly on glossy plastic
Zone A is where a 4Runner install stays sane after a season of grime.
Zone B: Looks great… until you need to work on it
Some locations look perfect in photos but are a pain when you need to:
- re-tighten hardware
- inspect connectors
- replace a module
If you have to remove major trim just to check one connector, Zone B becomes a “future you” problem.
Zone C: High-splash pockets and airflow headaches (avoid)
Zone C areas usually combine two bad things:
- they collect water/mud
- they’re near openings you probably don’t want to obstruct
Even if you can mount there, it’s rarely worth it.
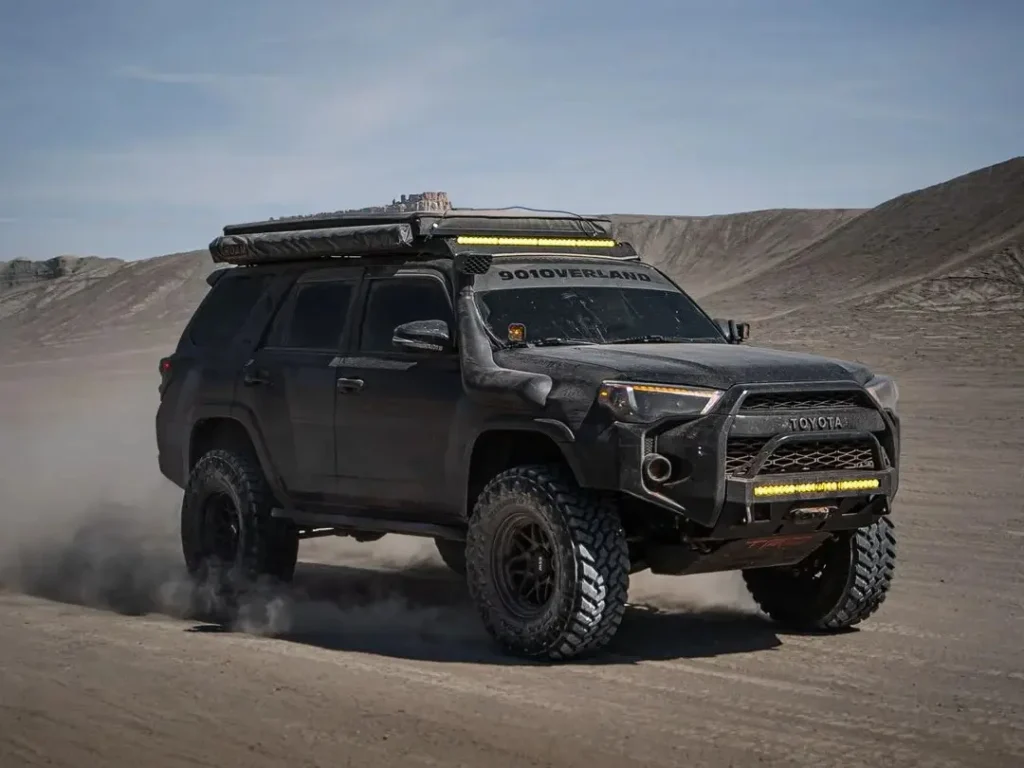
How many lights look right on a 4Runner?
The 4Runner grille can visually “handle” more modules than a small car, but that doesn’t mean more looks better.
2 modules: subtle and hard to mess up
If you want OEM-plus and low drama, two modules can look surprisingly clean—especially if you place them symmetrically in the outer thirds.
4 modules: the sweet spot for most builds
Four is usually the best mix of:
- visibility
- symmetry
- restraint
It also tends to avoid the “airport runway” look.
6 modules: only if your grille openings support it
Six can look sharp, but only when:
- openings are consistent enough that the light doesn’t get “chopped”
- you can keep height and angle identical across all six
- you’re not blocking airflow or cramming wiring into messy bundles
If your grille pattern fragments the output, six becomes visual noise fast.
The “broken light” effect: why some installs look cheap at night
A common complaint isn’t brightness—it’s ugliness. You mount a nice module, then at night it looks like scattered shards of light.
That’s usually the grille geometry masking the lens.
A quick test before you commit to a spot
Stand in front of the vehicle and look through the opening where the light will sit:
- Straight-on: can you see most of the lens through a clean opening?
- 30° left and right: does the opening disappear or split the lens?
- Check reflections: are there shiny edges directly in front that will light up?
If the lens is mostly hidden behind bars or shiny trim, the light won’t read as a clean “module.” It’ll read as glare.
Trail-proof priorities: serviceability beats perfection
A grille-light setup on a 4Runner should be built around two boring questions:
- Can I inspect it easily?
- Can I fix it easily?
Because eventually, you will.
Make it serviceable on purpose
A few practical habits make a huge difference:
- Keep connectors in spots you can reach without removing the whole grille
- Leave enough slack that you can pull a module out for inspection (without yanking wires)
- Avoid routing that forces you to cut zip ties every time you look at it
- Use mounting points that don’t require “third-hand” gymnastics to tighten
Hardware reality: vibration will find weak points
If the module can wiggle by hand, it’ll wiggle on the road. If the bracket flexes, aim will drift. It may still work electrically—just look crooked.
This article won’t turn into a mounting tutorial, but the principle is simple: rigidity and repeatable alignment matter more than cleverness.
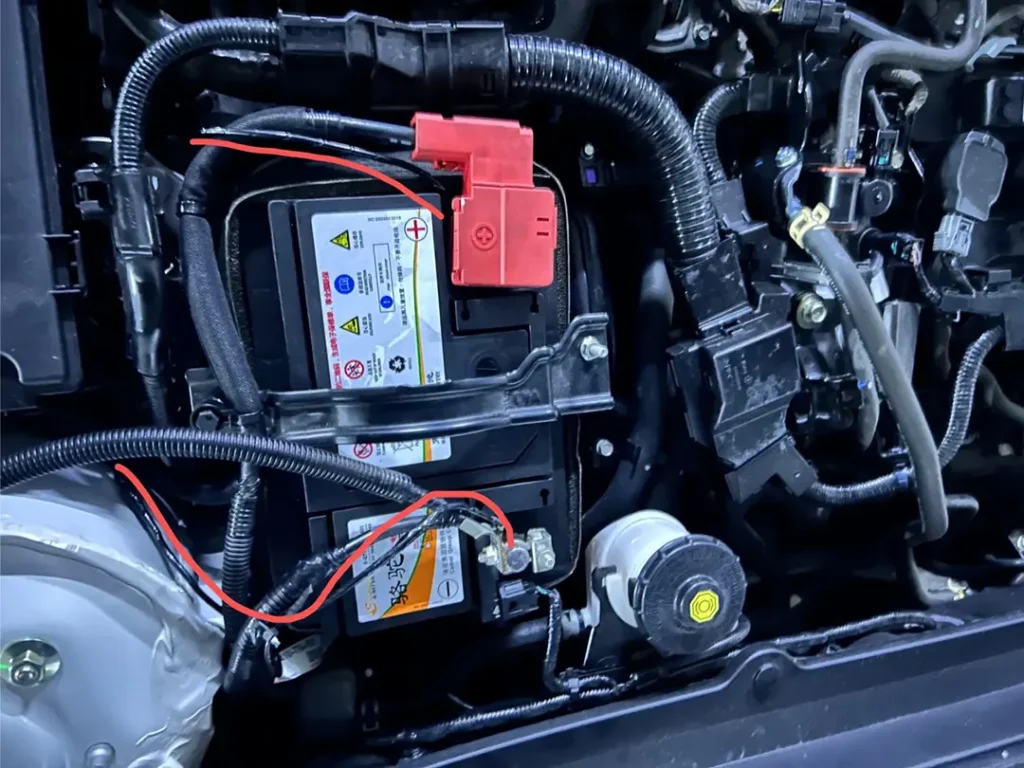
Mud, salt, and washes: where to place connectors (without giving a wiring lesson)
You don’t need to rewrite your wiring posts here; just give placement rules:
- Don’t park connectors at the lowest “catch basin” behind the bumper/grille
- Don’t bundle everything into one tight knot that stays wet
- Don’t place splices where they’ll be blasted directly by a pressure washer
Think “water path.” If water runs down and collects somewhere, avoid that spot.
Color and mode notes (short and practical)
For 4Runners that actually get used:
- Amber often reads more purposeful in dust, fog, and snow
- White can look cleaner and more OEM-plus on a street build
- Flashing/strobe modes are best treated as off-road/private property features where permitted, not daily road use
Keep it steady on-road and aim it so it doesn’t throw glare.

A 4Runner “buy before you regret it” checklist
This is the stuff that prevents returns and rework:
- Depth + connector bend: the module fitting isn’t enough; the plug has to fit too
- Access plan: can you tighten and re-check hardware later?
- Symmetry plan: sketch spacing (even on paper) before drilling/locking anything in
- Grille geometry: choose openings that don’t fragment the lens
- Future cleaning: assume you’ll have mud behind the grille—plan to reach it
FAQ
What’s the best number of lampu grille for a 4Runner?
Four is the usual sweet spot: symmetrical, visible, and still clean. Two is great for subtle OEM-plus. Six only works if your grille openings don’t fragment the output.
Why do my grille lights look harsh at night?
Usually reflection and angle—modules aimed too high or placed behind shiny edges. Placement through clean openings matters as much as brightness.
Are grille lights safe for off-road use?
Yes, if mounted rigidly, kept serviceable, and wired responsibly. Treat flashing modes as off-road/private property where permitted.