Saya membeli SUV saya dan segera mula melakukan perkara yang setiap pemilik SUV baru pura-pura tidak akan lakukan: membina versi khayalan “siap untuk pengembaraan darat” dalam kepala saya.
Tayar yang lebih besar? Mungkin. Rak bumbung? Suatu hari nanti. Tetapi peningkatan pertama yang sentiasa muncul ialah pencahayaan—khususnya Lampu sorot kereta LED. Bukan kerana saya merancang untuk mengejar bukit pasir setiap hujung minggu, tetapi kerana saya memandu pada waktu malam. Sangat kerap. Dan apabila anda pernah berada di jalan gelap di mana garisan tepi hilang dan selekoh seterusnya menjadi misteri, anda mula kurang peduli tentang “nampak cool” dan lebih mementingkan “saya nak tahu apa yang sebenarnya berlaku.”
Sudah tentu, terdapat satu lagi kebenaran yang tidak diucapkan orang: satu set yang baik lampu utama kereta boleh membuat kenderaan kelihatan lebih berkemampuan serta-merta. Ia seperti potongan rambut untuk bampar hadapan anda—tiba-tiba semuanya kelihatan lebih tajam.
Tetapi pencahayaan adalah salah satu peningkatan di mana melakukannya dengan salah boleh menjadikan anda pemandu itu—yang semua orang silau kerana lampu mereka disasarkan pada paras mata. Atau lebih teruk: anda membebani pendawaian, menyebabkan masalah kelipan, atau berakhir dengan susunan yang terang untuk dilihat tetapi sebenarnya tidak membantu anda melihat.
Panduan ini dimaksudkan sebagai versi “bual bicara sejujurnya”: apa itu lampu sorot, bagaimana lensa dan penapis terlibat dalam perbincangan, apa sebenarnya yang berubah selepas memasang lampu sorot LED, dan pendekatan pemasangan praktikal yang tidak bergantung pada nasib.
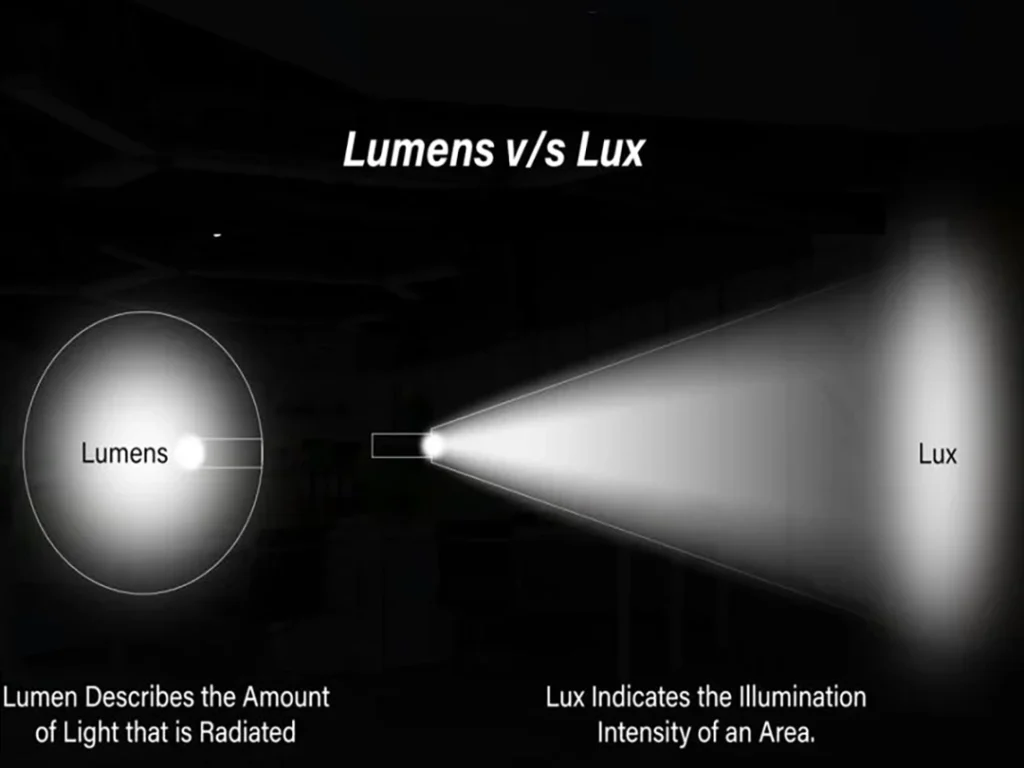
Lampu Sorot Kereta vs Lampu Sorot LED Kereta: Apa Sebenarnya Yang Anda Pasang?
Orang menggunakan “spotlight” sebagai istilah serba boleh, tetapi lebih baik tepat—kerana lampu yang “betul” bergantung pada masalah yang anda cuba selesaikan.
Apa maksud “car spotlights” biasanya
Dalam penggunaan harian, lampu utama kereta merujuk kepada lampu luaran tambahan Ditambah pada kenderaan—biasanya dipasang pada bampar, gril, palang pelindung hadapan, tiang A, atau rak bumbung. Ia bukan lampu utama kilang anda. Ia adalah tambahan yang direka untuk meningkatkan keterlihatan ke hadapan melebihi apa yang disediakan oleh sistem stok.
Lampu-lampu ini biasanya hadir dalam tiga gaya pancaran:
- Sinar tumpuan: lensa ketat dan jarak fokus panjang, untuk melihat lebih jauh di jalan atau laluan
- Batang rasuk banjir: lebar, untuk bahu, lekuk, dan keterlihatan pada kelajuan rendah
- Batang kombi: campuran lampu titik dan lampu limpah, popular untuk kegunaan harian kerana ia serbaguna
Apa yang ditambah oleh “spotlight kereta LED” ke dalam persamaan
Lampu sorot kereta LED gunakan cip LED sebagai sumber cahaya, bukannya halogen atau HID. LED kini mendominasi atas sebab-sebab yang kukuh:
- Keluaran tinggi berbanding penggunaan kuasa
- Ketahanan getaran (penting di jalan yang tidak rata)
- Kecerahan penuh serta-merta
- Hayat perkhidmatan yang panjang apabila penyejukan dilakukan dengan betul
Tetapi LED tidak semestinya bermakna “sinar yang lebih baik.” Sesetengah lampu sorot LED sangat terang tetapi kawalannya lemah—sehingga ia menyebarkan silauan ke merata tempat dan tidak meletakkan cahaya di tempat yang anda perlukan.
Cara terbaik untuk memikirkannya ialah:
- Kecerahan menjual
- Kawalan sinaran berfungsi
Istilah Pencahayaan Automotif yang Membingungkan Semua Orang (Lampu Sorot vs Lensa vs Penapis)
Jika anda telah menelusuri senarai atau bercakap dengan kedai, anda pasti pernah mendengar perkataan seperti “lensa,” “penapis,” “laser,” “projektor,” “spot,” “flood,” “lampu pemanduan,” “lampu pod,” “lampu kerja.” Ia boleh kedengaran seperti bahasa lain.
Berikut ialah penjelasan yang jelas menggunakan konsep tepat yang anda senaraikan.
Spotlight ialah keseluruhan unit lampu luaran.
Spotlight ialah keseluruhan unit lampu yang dipasang secara luaran. Banyak reka bentuk biasa menggunakan beberapa cip LED dalam rumah reflektor. Ia popular kerana ia mampu milik dan mudah didapati.
Mengapa begitu ramai orang memasangnya:
- Harga boleh diakses
- Pilihan pemasangan ada di mana-mana
- Mereka kelihatan bagus pada SUV/pickup.
Kelemahannya ialah pod “multi-chip” yang lebih murah sering mempunyai optik yang kurang halus, yang bermakna lebih banyak cahaya tersebar dan lebih silau.
Lensa (lensa projektor) bukan cahaya—ia adalah “mata”
A lensa ialah elemen optik di hadapan LED (atau di hadapan sumber cahaya). Orang memanggilnya “mata” kerana ia kelihatan seperti kubah kaca yang bulat.
Apa yang dilakukan oleh lensa yang baik:
- Membuat pengagihan cahaya lebih malah
- Meningkatkan pencahayaan yang boleh digunakan daripada LED yang sama
- Membantu membentuk pancaran cahaya supaya cahaya akhirnya di jalan raya bukannya di mana-mana
Semakan realiti penting: banyak lampu sorot gaya projektor luaran tidak mempunyai perisai pemutus yang betul Seperti sinaran rendah kilang. Ia mungkin masih menyilaukan jika diarahkan terlalu tinggi, kerana ia banyak bergantung pada pembiasan dan pembentukan cermin reflektor, bukannya mekanisme pemotongan yang ketat.
Jadi ya—lampu sorot yang dilengkapi lensa sering lebih baik, tetapi ia tidak semestinya “anti-silau.” Reka bentuk arah dan lebar masih penting.
Penapis hanyalah penutup berwarna.
A penapis ialah penutup kaca atau plastik berwarna yang diletakkan di hadapan lampu untuk menukar keluaran warna.
Alasan paling biasa orang menggunakan penapis:
- Ambar/kuning boleh berasa lebih selesa dalam hujan/kabus
- Penutup berona boleh mengurangkan kekasaran yang dirasai.
Apa penapis tidak lakukan:
- Ia tidak memperbaiki persepsi yang buruk.
- Ia tidak secara ajaib mengubah lampu sorot menjadi lampu kabus.
- Ia tidak menjadikan corak pancaran yang buruk itu selamat.“
Jika anda sedang memutuskan antara “optik yang lebih baik” dan “penapis berwarna,” pilih optik terlebih dahulu.
Apakah Perubahan Selepas Memasang Lampu Sorot LED pada Kereta? (Kesan Sebenar, Bukan Sekadar Gembar-gembur)
Ini adalah soalan teras anda: Apakah kesan memasang lampu sorot LED? Jawapan jujurnya ialah: banyak—sesetengah hebat, sesetengah berisiko, bergantung pada cara anda memilih dan memasangnya.
1) Kebolehlihatan dan masa tindak balas bertambah baik (apabila pancaran berguna)
Lampu sorot yang baik memanjangkan masa anda untuk bertindak balas. Di jalan gelap, “melihat lebih awal” bukan sekadar keselesaan—ia adalah keselamatan.
Susunan yang betul boleh membantu anda mengesan:
- Haiwan berhampiran bahu jalan
- Pejalan kaki menyeberang tanpa pakaian reflektif
- Bucu-bucu kaki lima yang patah
- Serpihan, kenderaan yang berhenti, atau halangan yang tidak bercahaya
- Lengkungan dan perubahan ketinggian lebih awal
Itu lebih penting daripada yang disedari orang. Otak menjadi rileks apabila ia mempunyai maklumat. Kurang meneka bermakna kurang keletihan.
2) Keyakinan pemandu meningkat (kadang-kadang terlalu tinggi)
Ini halus: lampu yang lebih terang boleh membuat anda rasa seolah-olah anda boleh memandu lebih laju dengan selamat. Jalan tetap jalan—permukaan basah, selekoh sempit, trafik tiba-tiba.
Pencahayaan yang baik adalah peningkatan, bukan kuasa luar biasa. Jika keyakinan anda meningkat, kekalkan disiplin anda.
3) Kenderaan anda menjadi lebih ketara
Set lampu sorot yang bersih mengubah “kehadiran” kenderaan. Orang perasan, dan itulah sebahagian daripada daya tarikannya. Tetapi ia juga bermakna:
- Anda akan lebih kelihatan (baik)
- Anda akan menarik perhatian polis trafik atau pemeriksaan (bergantung pada peraturan dan amalan tempatan)
- Jika lampu anda menyilaukan, anda akan diingati atas sebab yang salah.
4) Beban elektrik meningkat—kadang-kadang lebih daripada yang dijangkakan
Walaupun menggunakan LED, lampu tambahan menyedut arus sebenar, terutamanya model keluaran tinggi.
Dua perkara yang penting:
- Jumlah watt (atau arus tarikan) sistem pencahayaan anda
- Kapasiti pendawaian dan litar suis kenderaan anda
Jika anda menyambung ke wayar kilang kecil tanpa relay dan sekering yang sesuai, anda sedang berjudi. Ia mungkin berfungsi hari ini. Ia mungkin mencairkan penyambung bulan depan.
5) Pengurusan haba menjadi faktor kebolehpercayaan dalam dunia sebenar
LED adalah cekap, tetapi ia masih menjana haba pada cip dan pemacu. Jika penutupnya tidak dapat menyalurkan haba dengan baik, keluaran menurun dan jangka hayat menjadi lebih pendek.
Tanda-tanda reka bentuk terma yang buruk:
- Keluaran cahaya merosot selepas 10–20 minit
- Rumah menjadi sangat panas dengan cepat
- Cahaya itu “melindungi dirinya sendiri” dengan meredup atau memutuskan
6) Anda boleh mencetuskan silauan dan bahaya jika anda menyasarkan dengan salah
Ini yang paling penting. Lampu yang kuat tetapi bidikannya buruk lebih teruk daripada lampu yang lemah.
Lampu silau bukan sekadar “mengganggu.” Ia mengurangkan penglihatan pemandu lain dan meningkatkan risiko kemalangan. Malah lampu berkualiti baik pun menjadi berbahaya apabila diarahkan terlalu tinggi.
Cerita Pendek: “Peningkatan Cahaya Hari” yang memerlukan satu pembaikan kecil
Seorang rakan memasang sepasang lampu sorot LED padat—unit gaya projektor bulat dengan pancaran pusat yang sempit dan sedikit pancaran sisi. Pasangannya kelihatan kemas, seolah-olah ia diambil daripada senarai pilihan kilang.
Uji pandu malam pertama, dia teruja. Mesejnya pada dasarnya: “Ia seperti waktu siang.”
Kemudian realitinya: pemandu yang datang dari arah bertentangan mula memancarkan lampu secara berterusan kepadanya.
Tiada apa-apa yang “salah” dengan lampu-lampu itu. Masalahnya mudah: ia diarahkan sedikit terlalu tinggi, dan titik panasnya jatuh pada paras mata kereta yang datang. Kami memarkir di tanah rata menghadap dinding, menggunakan pemotongan lampu kepala sebagai rujukan, dan menyesuaikan lampu sorot ke bawah beberapa darjah.
Sepuluh minit kemudian, kilatan cahaya berhenti. Pencahayaan jalan tetap cemerlang.
Itulah saat kebanyakan orang terlepas. Mereka membeli lampu, memasangnya, mengambil gambar, dan tidak pernah menalanya dengan betul. Tetapi menala adalah perbezaan antara “Saya telah meningkatkan keterlihatan saya” dan “Saya telah meningkatkan kebolehan saya untuk mengganggu orang asing.”
Memilih lampu sorot kereta: Spot vs Flood vs Gabungan (Apa yang Berfungsi dalam Memandu Harian)
Banyak pembeli terperangkap dengan spesifikasi: watt, lumen, jenis cip, “lensa laser,” “sangat terang,” dan sebagainya. Spesifikasi itu penting, tetapi Corak pancaran lebih penting.
Sinar tumpuan: terbaik untuk jarak jauh
Pilih pancaran titik jika:
- Anda melakukan perjalanan jauh di lebuh raya pada waktu malam.
- Anda mahu julat jauh untuk melihat bahaya lebih awal.
- Jalan anda agak lurus dan terbuka.
Kompromi:
- Lebar yang lebih kecil, yang boleh menyukarkan pembacaan lengkungan dan bahu.
Sinaran banjir: terbaik untuk lebar dan kelajuan yang lebih perlahan
Pilih banjir jika:
- Anda memandu di jalan sempit dengan tepi yang tidak menentu.
- Anda melalui laluan lasak, jalan ladang, tapak kerja
- Anda mengambil berat tentang melihat bahu, parit, dan halangan berhampiran
Kompromi:
- Jangkauan jarak jauh yang lebih terhad
Bilah kombinasi: kompromi harian
Combo popular kerana ia memberikan:
- Bahagian lontaran jauh pusat
- Limpahan sisi untuk bahu dan lekuk
Bagi ramai pemilik SUV, combo adalah pilihan “pasang sekali dan jangan fikir lagi”—selagi ia disasarkan dengan betul dan digunakan secara bertanggungjawab.
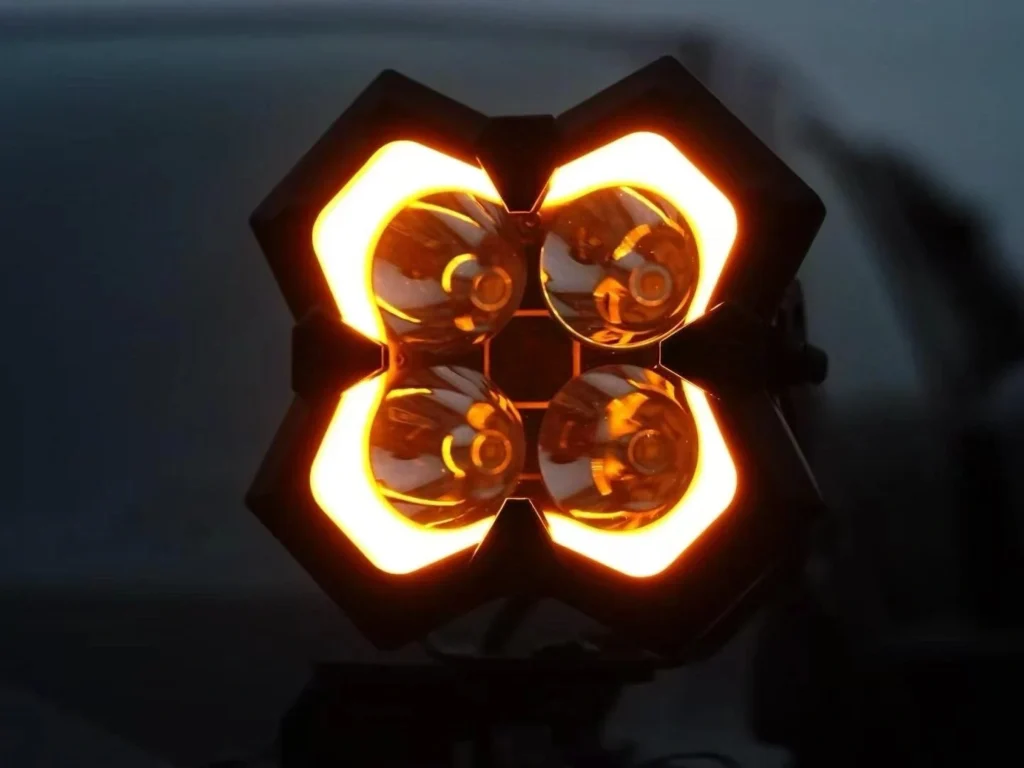
Lampu sorot LED jenis lensa: Mengapa ia sering terasa “lebih bersih” di jalan raya
Anda menyebut reka bentuk bulat gaya “lensa + meriam laser”. Sama ada “laser” adalah istilah pemasaran dalam kategori produk itu atau tidak, perkara penting ialah lensa gaya projektor.
Mengapa lampu sorot gaya projektor (lensa) sering terasa lebih baik:
- Pengagihan cahaya biasanya lebih teratur.
- Hotspot boleh ditakrifkan dengan lebih tepat, dengan limpahan yang lebih lancar.
- Jalan itu kelihatan bercahaya secara sekata, bukannya “titik-titik cerah yang tidak sekata”.”
Tetapi sekali lagi, tanpa pelindung pemotong yang sebenar, lampu-lampu ini masih boleh menyilaukan jika diarahkan terlalu tinggi. Lensa meningkatkan kualiti sinaran—ia tidak menggantikan penyasaran yang baik.
Penapis Warna dan Cahaya Jingga: Bila Ia Membantu, Bila Ia Hanya Gaya
Mari kita jujur: amber kelihatan cantik. Ia juga boleh selesa.
Apabila amber/kuning boleh membantu:
- Dalam hujan, ia boleh mengurangkan kekasaran yang dirasai.
- Dalam kabus, ia boleh terasa kurang mencerminkan.
- Bagi sesetengah pemandu, ia mengurangkan keletihan mata.
Di mana ia kebanyakannya bersifat kosmetik:
- Jika optik anda teruk, amber tidak akan membetulkan penyebaran.
- Jika matlamat anda ialah jarak maksimum pada malam yang cerah, putih tulen sering terasa “lebih tajam” (dengan andaian optik yang baik)
Pendekatan terbaik adalah praktikal:
- Pilih corak sinaran dan optik terbaik terlebih dahulu.
- Pilih warna berdasarkan keadaan anda dan utamakan keselesaan anda yang kedua.
Pemasangan: Cara Praktikal dan Selamat untuk Menambah Lampu Sorot LED pada Kereta
Bahagian ini mengikuti semangat langkah DIY anda, tetapi ditulis sebagai kaedah bersih dan sejagat yang boleh digunakan sama ada kenderaan itu mempunyai harness aksesori berwayar sedia ada atau tidak.
Garis dasar keselamatan (jangan tinggalkan ini)
Pemasangan yang betul harus merangkumi:
- Fus berhampiran bateri (melindungi pendawaian daripada litar pintas)
- Penghantar (menjaga arus tinggi supaya tidak memasuki suis papan pemuka)
- Gejah wayar yang betul dan tanah yang kukuh
- Penyambung kalis cuaca dan penghalaan yang selamat
Jika seorang pemasang mencadangkan “tiada relay, cuma pasang sambungan di sini,” itu bukan jalan pintas—ia adalah masalah masa depan.
Langkah 1: Sahkan voltan dan jumlah beban
- Kenderaan penumpang biasanya 12V
- Sesetengah lori dan peralatan adalah 24V
- Jika lampu anda mendakwa keserasian 12V/24V, tetap sahkan bahawa rangkaian wayar dan pemacu dibina untuknya.
Semak jumlah penggunaan kuasa anda:
- Satu lampu mungkin boleh diuruskan
- Dua lampu berkuasa tinggi beserta aksesori lain mungkin memerlukan perancangan yang lebih teliti.
Langkah 2: Gunakan talian kuasa ber-fuse daripada bateri
Bawa kuasa dari terminal positif bateri ke pemegang fius, kemudian ke relay.
Mengapa fius mesti berada berhampiran bateri:
- Jika wayar mengalami litar pintas di mana-mana sepanjang panjangnya, fius akan terbakar sebelum wayar itu terlalu panas.
Langkah 3: Gunakan relai (dan pilih pencetus anda)
Relay membolehkan suis arus rendah mengawal litar arus tinggi.
Pilihan pencetus biasa:
- Pemicu bersuis penghidangan: lampu sorot hanya berfungsi apabila enjin kereta dihidupkan
- Pemicu sinaran tinggi (interlok): lampu sorot hanya berfungsi apabila sinaran tinggi dihidupkan (sering lebih mesra jalan)
- Suíç berdiri sendiri: lebih banyak kawalan, tetapi lebih mudah dibiarkan terpasang secara tidak sengaja jika tidak direka dengan baik
Banyak pemilik suka suis yang diaktifkan semasa pengapian + suis berasingan: lampu tidak boleh dibiarkan menyala semasa diparkir, tetapi anda masih boleh memilih bila menggunakannya.
Langkah 4: Pilihan pemasangan (dan kesannya terhadap tingkah laku pancaran)
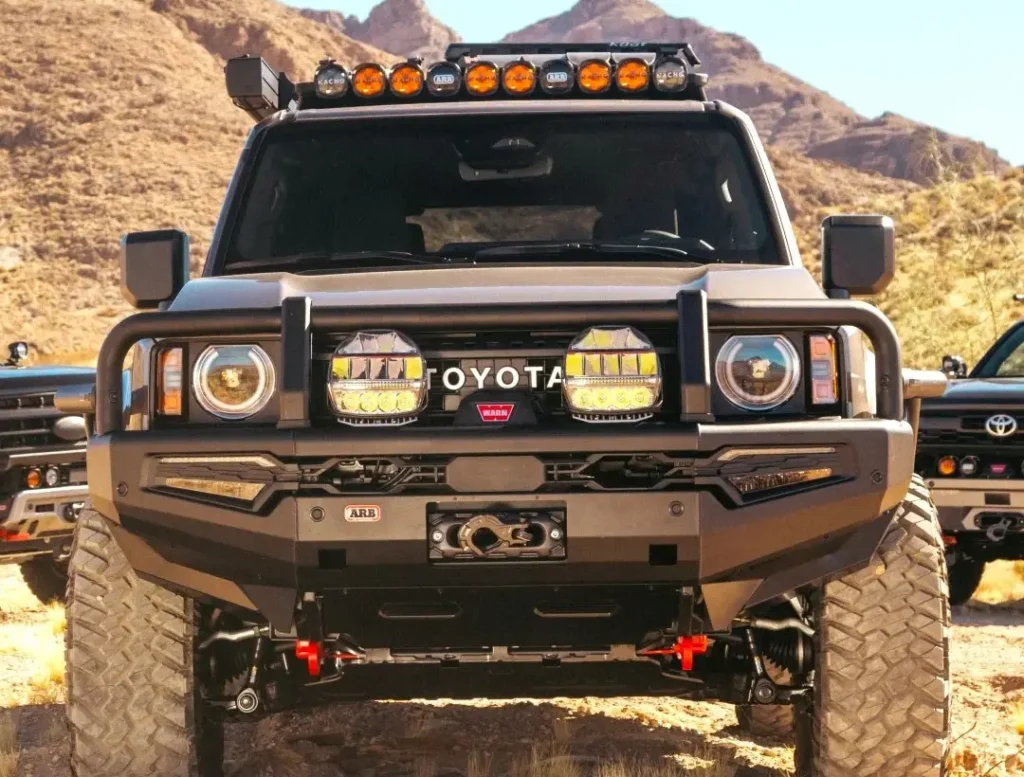
Bumper / gril / palang pelindung
- Biasanya paling mudah untuk bertindak secara bertanggungjawab.
- Kurang pantulan hud
- Sering kali, kompromi terbaik untuk pemanduan harian.
Pendakap tiang A
- Nampak agresif
- Boleh menghasilkan silau hud dan pantulan sisi
- Mudah tersasar kerana kedudukannya tinggi dan luas.
Jika anda menggunakan pemasangan A-pillar, disiplin penalaan menjadi lebih penting.
Pemasangan bumbung
- Sangat sesuai untuk pengimbasan luar jalan pada kelajuan rendah
- Sering kali paling teruk bagi silauan di jalan awam.
- Mungkin terhad bergantung pada peraturan tempatan
Langkah 5: Penyambungan dan penjejakan (kaedah “tiada derak-derak masa depan”)
Lakukan perkara-perkara ini dan anda akan berterima kasih pada diri sendiri kemudian:
- Pasang wayar dalam pelindung wayar.
- Jauhkan daripada komponen panas dan bahagian bergerak
- Pastikan setiap 10–20 cm dengan klip yang sesuai atau tali zip.
- Gunakan terminal crimp yang betul dan paip penyusut haba.
- Giling sehingga ke titik chassis yang bersih (buang cat untuk sentuhan kukuh jika perlu)
Jumlah aduan “lampu saya berkelip” yang mengejutkan sebenarnya berpunca daripada penyambungan bumi yang buruk.
Langkah 6: Menjana (langkah paling penting untuk kejayaan di dunia sebenar)
Kaedah penyasaran mudah yang berkesan:
- Parkir di tanah rata menghadap dinding kira-kira 5–7 meter jauhnya.
- Hidupkan lampu utama rendah anda dan catatkan ketinggian pemotongan/rujukan.
- Arahkan lampu sorot anda supaya titik panas utama adalah di bawah di mana ia akan bersinar ke dalam mata yang memandang ke arahnya.
- Uji jalan di bahagian yang sunyi dan laras semula.
Jika anda memandu kebanyakannya di jalan raya, matlamatnya ialah:
- Jarak berguna
- Silau minimum
- Tumpahan terkawal
Penggunaan: Cara Menggunakan Lampu Sorot Tanpa Menjadi Bahaya
Bahkan lampu sorot yang dipasang dengan sempurna boleh berbahaya jika digunakan secara cuai.
Tabiat baik:
- Gunakan mereka di jalan gelap yang terbuka dan tiada trafik dari arah bertentangan.
- Turunkan badan awal apabila anda melihat lampu depan di kejauhan.
- Matikan lampu utama apabila mengikuti kenderaan lain dengan rapat.
- Elakkan menggunakan lampu tambahan berkuasa tinggi dalam trafik bandar.
Jika anda mahukan suasana “pemandu profesional”, ia bukan tentang memancarkan sinar paling terang. Ia tentang menggunakan cahaya seperti alat.
Senarai Semak Pembelian: Apa yang Perlu Dicarian dalam Lampu Sorot LED Kereta
Berikut ialah senarai semak praktikal yang mengelakkan sensasi:
Optik dan corak sinaran
- Keterangan spot/flood/combo yang jelas
- Foto rasuk sebenar (di jalan raya, bukan sekadar dinding gudang)
- Tumpahan terkawal, bukan “cahaya di mana-mana”
Membina dan pengedapan
- Bumung padu dan pendakap pemasangan
- Segel yang betul (ketahanan air tidak boleh dikompromi)
- Reka bentuk breather membantu mencegah kabut dalaman.
Kestabilan pemandu
- Tiada kelipan pada kelajuan enjin senggang
- Kecerahan stabil dari masa ke masa
- Pengurusan haba yang baik (bukan sekadar heatsink yang cantik)
Kualiti tali
- Relay disertakan atau disokong
- Penyambung termasuk
- Penyambung yang betul
- Gejar wayar yang mencukupi untuk beban
Intipatinya: Kenaikan pangkat ke jawatan cahaya yang baik adalah sebahagian pencahayaan, sebahagian disiplin.
Satu set yang dipilih dengan teliti lampu utama kereta—terutamanya Lampu sorot kereta LED—boleh meningkatkan pemanduan malam dengan ketara. Mereka boleh mengurangkan keletihan, memanjangkan masa tindak balas, dan menjadikan jalan gelap terasa kurang menekan.
Tetapi susunan terbaik mempunyai tiga perkara yang sama:
- Kualiti sinar (optik sebelum spesifikasi pemasaran)
- Pemasangan yang betul (sekring + relai + pendawaian yang kemas)
- Penentuan sasaran dan penggunaan yang bertanggungjawab (kelihatan untuk anda, keselamatan untuk orang lain)
Lakukan perkara-perkara itu dengan betul dan anda akan mendapat manfaat sebenar: bukan sahaja sebuah SUV yang kelihatan lebih garang, tetapi juga perasaan bahawa anda tidak lagi meneka apabila jalan menjadi gelap.