Lampu kabus biasanya hanya mendapat perhatian apabila cuaca menjadi buruk—sehingga saat lampu itu langsung tidak menyala. Kemudian ia tiba-tiba bukan lagi ciri “bagus untuk dimiliki”; ia menjadi satu lagi perkara yang perlu anda selesaikan di jalan masuk rumah sebelum perjalanan hujan, perjalanan musim sejuk, atau pemeriksaan.
Artikel ini adalah untuk saat itu.
Daripada membincangkan lampu kabus mana yang perlu dibeli, bagaimana lampu kabus berfungsi secara teori, bila menggunakannya, atau berapa kosnya, ini memfokuskan pada satu perkara: cara mendiagnosis dan membaiki kerosakan lampu kabus biasa pada kereta sebenar—daripada yang meletup pembumian kepada penyambung yang berkarat akibat kelembapan di dalam sarung.
Jika anda sedang mencari lampu kabus isu atau a lampu kabus untuk kereta yang asyik bermasalah, mulakan di sini dan kerjakan dari atas ke bawah. Kebanyakan masalah lebih mudah daripada yang disangka.
Apa yang anda perlukan (jaga supaya mudah)
Anda boleh melakukan banyak perkara mengejutkan dengan alat asas:
- Lampu suluh
- Sarung tangan dan pemutar skru kecil yang rata (untuk klip/penutup)
- Multimeter atau lampu uji 12V
- Pembersih sentuhan / pembersih elektrik
- Beberapa sekering tambahan (arus yang betul)
- Alat tangan asas (soket 10mm adalah yang biasa)
Pilihan tetapi membantu:
- Pemindai OBD (untuk kenderaan baharu yang memantau mentol/modul)
- Gris dielektrik (untuk penyambung, digunakan dengan betul)
- Alat pencungkil kecil (untuk melepaskan kunci penyambung)
Langkah 1: Kenal pasti jenis sistem lampu kabus yang sebenarnya anda miliki
Sebelum menyelesaikan masalah, kenali apa yang anda hadapi. “Lampu kabus tidak berfungsi” boleh bermaksud perkara yang berbeza bergantung pada kereta anda.
Susunan biasa
- Lampu kabus halogen kilang (litar ringkas)
- Yang paling mudah: suis → pengantara → fius → mentol → tanah
- Lampu kabus LED kilang (dikawal oleh modul)
- Sering diintegrasikan dengan modul kawalan badan (BCM)
- Sesetengah menggunakan pemacu dan boleh memaparkan kod ralat.
- Lampu kabus aftermarket untuk kereta (kabel + relay, atau integrasi CANbus)
- Boleh memperkenalkan titik kegagalan tambahan: pemutus litar terbina dalam, relai, sambungan pemutus litar tambahan, sambungan, pendaratan yang buruk
Jika lampu kabus anda dipasang sebagai kit, cari:
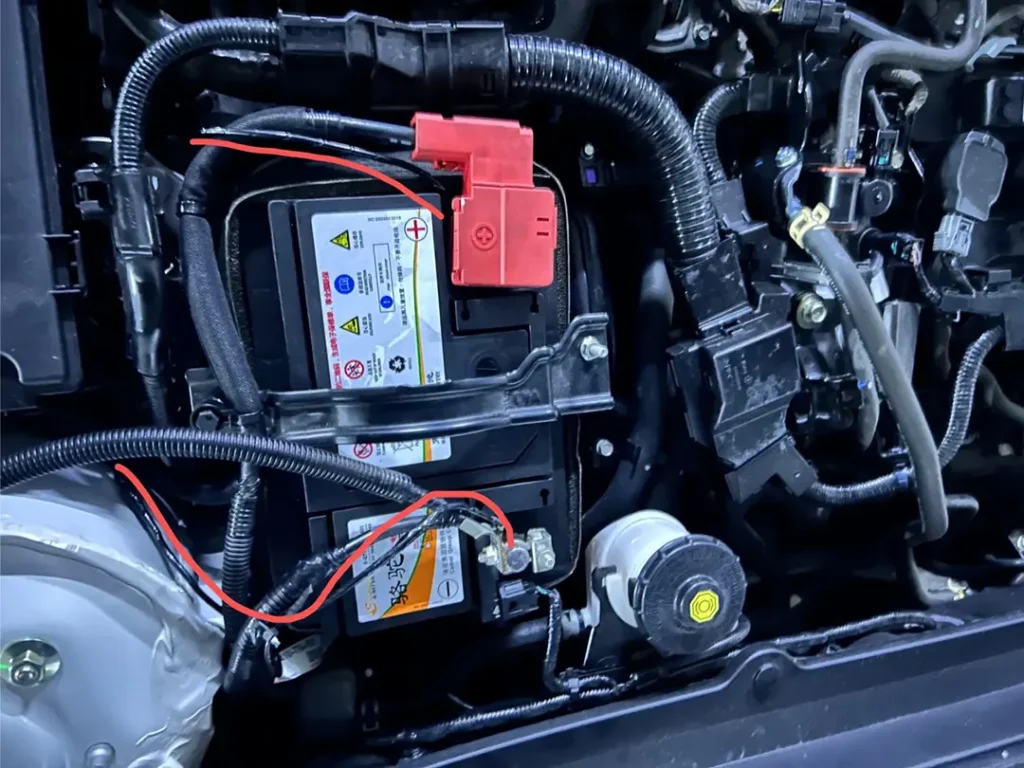
- Pemegang fius dalam talian (selalunya berhampiran bateri)
- Lokasi peralihan
- Tempat pendaratan tali pinggang ke casis
Ketiga-tiga item tersebut menerangkan peratusan besar kegagalan.
Langkah 2: Pastikan kereta membenarkan lampu kabus dihidupkan.
Ini kedengaran terlalu asas, tetapi ia menjimatkan masa.
Semakan pantas yang sering mengelirukan orang
- Banyak kereta memerlukan Lampu rendah atau lampu parkir hidup sebelum lampu kabus boleh diaktifkan.
- Sesetengah kereta mematikan lampu kabus apabila Lampu utama dihidupkan.
- Sesetengah kereta tidak membenarkan lampu kabus belakang dihidupkan melainkan lampu kabus hadapan sudah dihidupkan (bergantung pada pasaran).
- Sesetengah kenderaan secara automatik membatalkan lampu kabus selepas kunci dimatikan; yang lain pula mengingati keadaan terakhir.
Jika penunjuk lampu kabus di papan pemuka tidak menyala apabila anda menghidupkannya, itu adalah petunjuk:
- Mungkin ia adalah isu di pihak kawalan (suitch, logik BCM, pengekodan, kawalan relay)
- Bukan masalah mentol/rumah
Langkah 3: Mendapatkan diagnosis berdasarkan simptom (jalan terpantas)
Daripada memeriksa semuanya secara rawak, gunakan simptom untuk memilih pemeriksaan yang tepat.
Gejala A: Kedua-dua lampu kabus tidak menyala
Punca yang paling mungkin:
- Fius meletup (fius utama kabus atau fius bersiri dalam rasuk pendawaian)
- Relai rosak
- Tiada bekalan kuasa (masalah sambungan bateri, fius tambahan)
- Masalah kawalan Switch/BCM
- Kegagalan titik bumi bersama (kurang biasa, tetapi mungkin)
Gejala B: Hanya satu sisi berfungsi
Punca yang paling mungkin:
- Mentol terbakar / unit LED rosak pada satu sisi
- Penyambung yang rosak di sebelah itu
- Masalah tanah tempatan di sebelah itu
- Kabel yang rosak di sebelah itu (tergeser sehingga terlarut, terjepit, kerosakan akibat impak)
Gejala C: lampu kabus kadang-kadang menyala, berkelip, atau terpadam apabila melalui lubang atau jalan berbonggol
Punca yang paling mungkin:
- Pin penyambung longgar
- Karat di dalam penyambung
- Tanah lemah
- Relai dengan sentuhan yang buruk
- Penyambungan wayar tidak selamat (geseran/tegangan)
Gejala D: Lampu kabus berfungsi, tetapi terdapat kelembapan/kabus di dalam rumah lampu.
Punca yang paling mungkin:
- Kondensasi biasa berbanding kebocoran sebenar (dua perkara yang berbeza)
- Segel/gasket gagal
- Penutup belakang hilang atau pemasangan penutup yang longgar
- Vent/lubang pernafasan tersumbat
- Retakan pada lensa/rumah (selalunya akibat serpihan jalan)
Simptom E: Lampu kabus mencetuskan amaran, ralat, atau mesej papan pemuka
Punca yang paling mungkin:
- Konversi LED yang menarik arus lebih rendah/lebih tinggi daripada yang dijangkakan
- Konflik pemantauan mentol BCM
- Modul pemacu yang rosak
- Perubahan rintangan pendawaian akibat kakisan
Langkah 4: Semakan elektrik 10 minit (kuasa, fius, relay, bumi)
Ini adalah aliran kerja teras. Jangan lakukannya.
4.1 Periksa fius terlebih dahulu
Mungkin terdapat lebih daripada satu:
- A sekring kilang dalam kotak pemutus litar
- Seorang fusi dalam talian dalam harness pascamasa
Apa yang perlu dilakukan:
- Tarik fius dan periksa ia (jangan hanya lihat melalui plastik—periksa jalur logam)
- Gantikan dengan arus yang sama hanya
Jika ia terus-menerus berderu semula, anda mungkin mempunyai:
- Singkat ke tanah (insulasi wayar rosak)
- Pencemaran air dalam penyambung
- Pemasangan wayar yang salah atau tali wayar yang terjepit
4.2 Periksa relay (jika ada)
Relai gagal lebih kerap daripada yang dijangkakan orang, terutamanya jika ia terdedah kepada kelembapan.
Semakan relay pantas:
- Tukar dengan relai yang sama (jika kotak fius anda menggunakan jenis yang sama di tempat lain)
- Dengar/rasakan bunyi klik apabila menghidupkan lampu kabus.
- Gunakan multimeter untuk mengesahkan bahawa sisi kawalan sedang mendapat kuasa.
Tiada klik tidak semestinya bermakna relay rosak—ia boleh bermakna tiada isyarat kawalan.
4.3 Semak kuasa pada penyambung lampu kabus
Putuskan penyambung lampu kabus dan uji:
- Hidupkan lampu kabus (dan lampu rendah/lampu parkir jika perlu)
- Ukur voltan pada pin kuasa ke tanah casis.
Anda mahukan sesuatu yang hampir dengan voltan bateri (selalunya sekitar 12V apabila enjin dimatikan, lebih tinggi semasa enjin berjalan). Jika anda mendapat kuasa di sana, masalahnya mungkin:
- Unit mentol/LED itu sendiri
- Pemasangan penyambung/pin
- Laluan pulang bumi (bergantung pada reka bentuk pendawaian)
Tiada kuasa pada penyambung? Bergerak ke hulu:
- Keluaran relai
- Keluaran Fuse
- Memasang pemakanan berhampiran bateri
4.4 Periksa bumi (ini pembunuh senyap)
Pendawaian bumi yang buruk boleh meniru mentol yang rosak, relay yang rosak, atau lampu kabus yang lemah.“
Cara menguji:
- Gunakan multimeter untuk mengukur kejatuhan voltan antara bumi lampu kabus dan kutub negatif bateri semasa lampu diarah ON.
- Penurunan voltan yang tinggi menunjukkan rintangan bumi (karat, bolt longgar, cat di bawah terminal cincin).
Penyelesaian praktikal yang sering berkesan:
- Keluarkan bolt tanah
- Bersihkan sehingga terdedah logam
- Pasang semula dengan ketat
- Lindungi kawasan itu untuk melambatkan kakisan (jangan perangkap kelembapan)
Langkah 5: Jika hanya satu lampu kabus berfungsi — kenal pasti masalah khusus pada setiap sisi
Apabila satu pihak gagal, penyelesaian masalah menjadi lebih mudah.
5.1 Tukar komponen dari sisi ke sisi (apabila boleh)
Jika lampu kabus anda menggunakan mentol yang boleh diganti:
- Tukar mentol kiri ↔ kanan
- Jika masalah itu mengikuti mentol, maka itulah mentolnya.
- Jika ia kekal di sebelah yang sama, ia adalah pendawaian/penyambung/bumi.
Untuk pemasangan lampu kabus LED yang tersegel, anda tidak selalu boleh menukarnya dengan cepat—tetapi anda sering boleh menukar penyambung atau menguji unit tersebut dengan sumber kuasa yang diketahui baik.
5.2 Periksa penyambung dengan teliti
Cari:
- Kerak hijau/putih (kakisan)
- Pin bengkok
- Terminal wanita longgar yang tidak mencengkam
- Air di dalam butang penyambung
Bersihkan dengan pembersih sentuhan elektrik, biarkan kering, kemudian uji semula. Jika pin longgar, penyambung mungkin perlu dibaiki atau diganti.
5.3 Periksa kerosakan fizikal pada tali pinggang keledar
Lampu kabus terletak rendah dan di hadapan—tepat di mana:
- Serpihan jalan melanggar
- Roda-roda memercikkan air dan kotoran
- Tin bawah plastik menggosok tali pinggang keledar
Semak untuk:
- Keselaran berhampiran pendakap pemasangan
- Kabel yang dicekik di belakang klip bampar
- Penebat rosak berhampiran tepi tajam
Jika anda menemui tembaga terdedah, jangan sekadar menampalnya dengan pita dan melupakannya. Baiki dengan betul (pembetungan haba, penyambung tersegel) kerana kelembapan akan kembali dan kerosakan akan berulang.
Langkah 6: Lampu kabus yang berkelip dan menyala seketika — kategori “hampir berfungsi”
Masalah berselang-seli adalah yang paling menjengkelkan kerana ia hilang semasa anda mengujinya.
Punca biasa (dalam kehidupan sebenar)
- Titik bumi yang hampir ketat
- Pin penyambung longgar sehingga bergetar
- Relai dengan kenalan tanpa duri
- Susunan wayar tambahan dipasang terlalu dekat dengan sumber haba
- Pencerobohan air yang datang dan pergi mengikut suhu
Ujian praktikal
Dengan lampu kabus dihidupkan:
- Goyangkan penyambung dengan perlahan.
- Goyangkan tali pinggang keselamatan itu sepanjang laluannya.
- Ketuk relay dengan ringan
Jika lampu terputus-putus, anda telah menemui mekanikal/sambungan elektrik isu.
Peningkatan pantas yang mengurangkan kegagalan berulang
- Pasangkan tali pengaman dengan klip/tali zip yang sesuai (elakkan tepi tajam)
- Pastikan penyambung “klik” dan terkunci
- Giling semula ke titik casis yang bersih
- Gantikan relai murah dan pemegang fius yang meragukan (mereka cepat rosak apabila digunakan lama)
Langkah 7: Kelembapan di dalam rumah lampu kabus — apa yang normal berbanding apa yang menjadi masalah
Orang sering menganggap sebarang kabus bermakna unit itu bocor. Tidak semestinya.
Kondensasi biasa (biasanya tidak mengapa)
- Kabut ringan yang muncul selepas mencuci kereta atau perubahan suhu
- Ia hilang selepas lampu memanas atau selepas memandu dalam keadaan kering.
Banyak sarung mempunyai ventilasi untuk menyamakan tekanan. Ini boleh membolehkan kelembapan mengondensasi seketika.
Kebocoran sebenar (perlu perhatian)
- Titisan air atau genangan
- Kabut yang tidak pernah reda
- Jejak kotoran yang kelihatan di dalam lensa (kotoran yang dibawa air)
Apa yang perlu disemak
- Penutup belakang dipasang dengan betul (sangat biasa)
- Keadaan gasket (pipih, koyak, hilang)
- Retakan pada rumah akibat impak batu
- Vent/breather tersumbat dengan lumpur atau lilin
Mengapa kelembapan penting walaupun lampu masih berfungsi
Air membawa kepada:
- Karat pada terminal
- Kelipan dan tingkah laku berselang-seli
- Kegagalan pemacu LED pramatang
- Kemerosotan reflektor/lensa dari masa ke masa
Jika anda membaiki kelembapan dengan cepat, anda sering dapat mengelakkan senario “berfungsi hari ini, mati bulan depan”.
Langkah 8: Lampu kabus hidup, tetapi kelihatan malap atau tidak sekata
Ini berbeza daripada “tidak berfungsi,” tetapi ia adalah aduan biasa selepas beberapa bulan penggunaan.
Punca keluaran malap
- Kabus/lubang kecil pada kanta akibat pasir jalan raya
- Penurunan voltan akibat kakisan atau penempatan bumi yang lemah
- Jenis mentol yang salah (sistem halogen dengan watt yang salah/sesuai)
- Mentol halogen yang menua
- LED pascasumber dengan pengurusan terma yang lemah (keluaran menurun apabila panas)
Diagnostik pantas: ukur voltan pada lampu.
Jika anda menyalurkan kuasa kepada lampu kabus halogen dan hanya mendapat, contohnya, 10.5–11V pada penyambung semasa enjin berjalan, mentol akan kelihatan lemah. Cari rintangannya:
- Kotak lutsinar yang berkarat
- Relai lemah
- Tanah buruk
- Kabel bersaiz tidak mencukupi dalam harness aftermarket
Corak tidak sekata dari sisi ke sisi
Jika satu sisi kelihatan “lebih rendah,” “lebih tinggi,” atau berselerak:
- Pendakap pemasangan mungkin bengkok
- Pendawaian mungkin tidak dipasang dengan betul
- Satu unit mungkin mengalami kerosakan dalaman.
Ini terutamanya biasa berlaku selepas terkena bonggol kuda atau selepas membaiki bampar.
Langkah 9: Ralat papan pemuka dan penukaran LED (kereta moden)
Pada banyak kereta baharu, sistem pencahayaan dipantau. Menukar beban elektrik boleh mengelirukan sistem.
Apa yang berlaku
- BCM menjangkakan pengambilan arus tertentu.
- Pengganti LED menyedot arus secara berbeza berbanding halogen.
- Kereta memaparkan amaran bulb-out atau mematikan litar.
Apa yang tidak boleh dilakukan
- Jangan sewenang-wenangnya menambah perintang tanpa memahami haba dan penempatannya. Perintang beban akan menjadi panas dan boleh membahayakan kebakaran jika dipasang dengan buruk.
Apa yang biasanya berhasil
- Gunakan lampu kabus yang direka untuk sistem pemantauan kenderaan anda.
- Jika kereta anda menyokong pengkodan/pemprोगraman untuk lampu kabus LED, lakukan dengan betul.
- Betulkan pendawaian/penyambungan ke bumi terlebih dahulu; banyak “masalah CANbus” hanyalah disebabkan sambungan yang buruk.
Jika matlamat anda adalah kebolehpercayaan, kestabilan lebih penting daripada mengejar angka dalam helaian spesifikasi.
Langkah 10: Pokok keputusan mudah (cetak ini dalam fikiran)
Apabila anda tersekat, jalankan logik ini:
- Penunjuk tidak menyala pada papan pemuka
- Semak logik suis, tetapan, kawalan BCM, pencetus relay
- Lampu penunjuk, kedua-dua lampu kabus dimatikan.
- Periksa fius → relai → bekalan kuasa → bumi utama
- Lampu penunjuk, satu sisi mati
- Tukar mentol (jika boleh) → periksa penyambung → periksa pendawaian sisi → periksa bumi sisi
- kedip-kedip
- Integriti bumi dan penyambung dahulu → kemudian pemegang relai/sekring → kemudian laluan pendawaian
- Kelembapan
- Penutup/gasket/vent → kemudian retakan → kemudian kakisan penyambung
Kebanyakan orang membuang masa dengan memulakan pada pemasangan lampu. Mulakan dengan bekalan kuasa dan bumi.
Bilakah perlu berhenti melakukan sendiri dan menyerahkan kepada orang lain
Adalah wajar untuk melibatkan bengkel jika:
- Sekatan litar terus terputus (litar pintas perlukan penjejakan yang betul)
- Kabel rosak teruk jauh di belakang bampar dan anda tidak dapat mengaksesnya dengan selamat.
- Kenderaan ini memerlukan pengaturcaraan/penyandian untuk konfigurasi pencahayaan.
- Anda melihat penyambung yang cair, wayar yang terlalu panas, atau tanda-tanda percikan elektrik.
Kerosakan elektrik boleh dibaiki dengan selamat—apabila anda membaikinya dengan betul.
Nota penutup: lampu kabus yang berfungsi dengan boleh dipercayai biasanya “membosankan”
Lampu kabus terbaik untuk pemilik kereta bukanlah yang dramatik. Ia adalah sistem yang dihidupkan setiap kali, tidak berkelip, tidak menahan air, dan tidak memaparkan ralat. Kebanyakan kegagalan berpunca daripada tiga perkara asas: sekring, penalaan bumi, dan penyambung—terutamanya pada lampu yang terdedah, basah, dan berada di tempat yang rendah.
Jika anda mahu, tampal (1) model/tahun kenderaan anda dan (2) sama ada lampu kabus anda adalah halogen kilang, LED kilang, atau kit pasaran lepas. Saya akan memetakan titik ralat paling berkemungkinan mengikut urutan dan memberitahu anda dengan tepat apa yang perlu diuji terlebih dahulu supaya anda tidak mengejar hantu.